Pages

Paper bead necklace with pendant

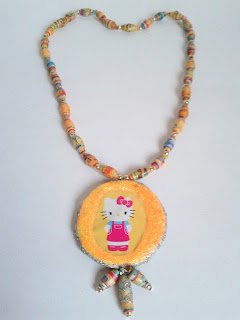
      I was quite happy with my last experiment with paper beads. I saw many videos on making paper pendant and decided to try it out with few changes so that it suits my daughter's taste :-)


Iam going to enter this also on Itsy Bitsy contest.
Here's the tutorial:

Please read my previous post on making paper beads.
These are the things I used for making the beads and pendant.
For the pendant, I used:
-cardboard
-eye pin
-white paper
-sticker/printout of a picture
-glitter powder
-glitter glue to decorate the pendant. I used Elmer swirl glitter glue.
-head pins
-paper beads
-small golden beads that matches the paper bead

For the necklace:
-paper beads
-small golden beads
-paper pendant
-elastic cord
-nail clipper to cut the extra cord after tying the knot
-fevi kwik to secure the knot

Making the paper pendant and necklace:
Click on the green arrow to read.

Paper bead jewellery

         I have been learning and trying out different types of jewellery. I came across paper bead jewellery and it is simple and cute. There are many tutorials using different techniques and products but some of the items are not available here like modge podge, diamond glaze. 

After rolling the beads, you have to glaze the beads to make them water-resistant, hard and have a shiny finish. Modge podge is a good way to do it. I read an nice article about making your own modge podge. It is quite simple, mix equal quantity of fevicol and acrylic gloss medium. And apply two coats of this mixture to make the beads hard and water resistant. Once it dries, apply varnish (be careful to use good quality paper so that print doesn't fade on varnishing) to get the shiny finish.
My daughter let me use her old gift wrappers to make the paper beads on one condition, that I make jewellery for her :-). So this is the necklace I made for her.


Iam entering this for Itsy Bitsy contest which requires a tutorial. I gave a lot of thought about making the tutorial then decided to put my coding skills into use. I included javascript sliders that I had coded for my website.

So here goes:

The things you will need:
    a) for paper beads

-paper. I used old gift wrapper.
-glue. I used modge podge that I made. Mixed equal quantity of fevicol and camel's acrylic gloss medium
-palette or plastic bowl for mixing the modge podge
-scissors
-ruler
-pen
-round toothpicks
-thermocol sheet to stick your toothpick to let them dry
-one old used paintbrush
-varnish. I used camel's picture varnish
-glitter powder

  b) for necklace
-head pins
-stretch/elastic cord.
-few other beads that match your paper beads.
-nail clipper. I find nail clipper cut more closer to the knot than scissors.
-jewellery glue to apply at the knot so that it doesn't loosen. I used fevikwik.


Part 1: Making the paper beads.
Press on the green arrow to start.

Part 2: Making the shiny paper beads.
Press on the green arrow to start.

Part 3: Making the paper bead necklace.
Press on the green arrow to start.


Flower Pendant

   I found these beautiful royal red glass beads. I did circular brick stitch around the large flat red bead and after long hours of weaving , the pendant


The completed necklace
                   

Iam entering this months Beading friends forever contest which is to create a flower using beads or wire.

Beaded Jhumkas

            There is a good tutorial by beadaholique on tubular netting. It is pretty simple and I assume it is mainly used for making necklaces. But I tried something different and after few failures, it turned out quite well. The finished jewellery, is beaded jhumkas.


Black and White

         I find black and white the most elegant and alluring colour combination. I went to a shop in HSR layout (Bangalore) called Itsy Bitsy which has a huge collection of beads. Its a jewellery makers paradise. 
Found these cute black glass beads with white dots. It immediately hit me that I can make a necklace out of it. Luckily I found a black tear drop cabochon in the shop itself. I was so excited that I could visualize  the beaded pendant so got on to work immediately. 
I did circular brick stitch with opaque and white seed beads and used white pearls for the decorative edge. And here is the finished pendant,


Then made the chain with the black glass beads and few black and white pearls. 

Beaded Pendant and Earrings using brick stitch

   I learnt a new beading technique called brick stitch and these are my latest creations.
For the earring, I used sandstone bead as the center.


And for the pendant, I used a blue crystal..


For the next pendant, I stitched around a wire frame

I used 5 cm of 24 gauge steel wire to make a round wire frame. Then made loops at both ends so that I can attach it to a jump ring. Then I did the brick stitch around the wire frame and shaped the frame while weaving the beads to form a teardrop. To cover the center space, I did a dangling piece using a eyepin.


Turquoise Chips Bracelet

   I found these dainty turquoise chips in my mother's jewel box. My dad had specially bought it for her. He had a keen interest in gemstones and his collection includes rivolis in exquisite colours . I would love to try the beaded bezel setting on them.


I decided to make a bracelet out of the turquoise chips and pearls something similar to a charm bracelet. I put a combination of turquoise chips and pearls on the head pins. Looped the head pins leaving some space from the beads so to get a nice dangling effect and connected it to a silver coloured chain. I didn't add the clasp right  at the end so a small length of chain hangs even on wearing the bracelet which gave it a pretty effect.


Finished product :-)


Spiral Rope Stitch

    Now I know why they charge so much for a bead weave necklace. I have been doing a spiral rope stitch  for the beaded bezel pendant, its been three days and Iam not even half way through. There is this nice tutorial by Beadaholique (I guess Iam their biggest fan :-). Its quite simple just time consuming.


While I was doing it I got an another idea of making earrings by looping the spiral rope just like those hoop ones. I could start on it when I finish this chain....phew :-(

Beaded Bezel

          I found a marble piece when i was putting away my daughter's toys. It just so happened that it looks like a cabochon. My initial trials of beaded bezel, all ended up being flat and it needs to be tubular so that the cabochon can be laid inside. Then I found this nice tutorial by Beadaholique on How to Weave a Basic Beaded Bezel. It still took me two days to finish it.


The basics technique followed is a peyote stitch. The first thing to do is to string the correct numbers beads to cover the cabochon and then make a loop. Then start the peyote stitch and continue till you have your desired pattern. And to get that tubular effect so that cabochon sits inside is to use  two different sizes of beads.
Now I planning to learn spiral rope stitch to make the chain for this pendant.

Simple Wired Earrings

These are the few simple earrings I did using head pins. I only tried the simple looping of the head pin.


Wire wrapping is another vast jewellery technique. I need to find some good quality silver coloured 24 gauge half hard wire to try few of them. There are so many varieties to choose from. The gauge measures the diameter of the wire. The lower the gauge, the thicker the wire. Then there is the wire hardness; dead soft, half-hard and full hard.


Special Thanks to Aleshia

                  I first started making beaded jewellery watching Aleshia's tutorials on youtube. Her tutorial videos are wonderful and she explains it so elaborately. 
I made these watching her tutorials.

And thanks to my aunt who gave me her spare jewellery tools and findings. Her blog is very informative for learning wired jewellery.